Garage Floor Coating 101: Epoxy Options, Design Tips, Pricing & Maintenance in Twin Falls
Why Garage Floor Coating Matters
Your garage floor takes a beating. Between vehicles, tools, bikes, spills, and foot traffic, it's one of the most abused surfaces in your home—and yet, it’s often the most neglected.
In Twin Falls, we see everything from freezing winters that bring in slush and road salt to hot, dry summers that kick up dust and debris. Bare concrete floors don’t stand a chance for long. They stain easily, crack over time, and shed dust that ends up tracking into your home. And while a concrete slab might look “tough,” it’s anything but when put to the test day after day.
That’s where garage floor coating steps in. A professionally installed epoxy floor doesn’t just improve the appearance of your garage—it transforms it. You get a surface that’s tougher than concrete, easy to clean, resistant to oil and chemicals, and flat-out better looking. Think less about utility and more about upgrading your garage into a space you actually want to use.
Whether you use your garage for storage, parking, projects, or as a full-blown workshop, coating the floor adds long-term value. It’s functional. It’s durable. And yes—it can look like a high-end showroom if that’s your thing.
In this guide, we’ll walk you through everything you need to know before you commit: what garage floor coating really is, why epoxy is the most trusted solution, how much it costs, how it’s installed, and how to keep it looking sharp for years.
What Is Garage Floor Coating? (And What It's Not)
Let’s clear something up right out of the gate: not all garage floor coatings are created equal. And if you’ve been staring at those DIY epoxy kits in the big box store aisle wondering if they’ll do the trick… it’s time for a reality check.
Garage floor coating refers to any protective layer applied over a concrete slab to enhance durability, resist damage, and improve appearance. The most common types include epoxy, polyurea, and polyaspartic coatings—each with different levels of performance, cure time, and cost.
A true coating bonds with the concrete surface, hardening into a solid, long-lasting barrier. Done right, it protects against oil, salt, chemicals, moisture, and abrasion. It also makes cleanup easier and cuts down on concrete dust, which is a constant nuisance in unfinished garages.
But here’s where homeowners get tripped up: not everything that looks like epoxy is actually a quality floor coating. Those one-part “epoxy paints” you find at hardware stores? They’re more like glorified paint with a drop of epoxy resin mixed in. They don’t bond well, they wear fast, and they peel under real use—especially in Twin Falls, where we deal with temperature swings, snow melt, and grit off the roads.
Then there’s sealers, which are clear coatings that provide some protection and enhance color—but they’re not designed to handle hot tires, jack stands, or chemical spills. And concrete paint? Forget it. It looks good for about two months before it starts flaking off.
If you’re investing in your garage, you want a true two-part coating system, professionally installed. This includes mechanical surface prep (usually grinding), a primer or base layer, optional color flakes or additives, and a durable topcoat. The result? A floor that holds up for 10–20 years with minimal maintenance.
Bottom line: if it doesn’t involve prepping the concrete and mixing multiple components on-site, it’s not a real garage floor coating—it’s just a shortcut.
Next, we’ll break down why epoxy has become the go-to material for garage floors across the U.S., and especially here in Southern Idaho.
Why Epoxy Is the Go-To for Garage Floors
If you’ve been looking into garage floor coating options, you’ve probably heard the word “epoxy” more times than you can count. And for good reason—it consistently outperforms most other coatings when it comes to durability, longevity, and value. For homeowners in Twin Falls, where garages double as storage, workspaces, and mudrooms, epoxy just works.
Let’s start with what makes epoxy different. A true epoxy floor is made from a two-part mixture of resin and hardener that chemically reacts and bonds to the concrete surface. Once cured, it forms a dense, plastic-like surface that doesn’t just sit on the concrete—it becomes part of it.
Built to Take a Beating
A professionally installed epoxy floor can handle everything from hot tires and dropped tools to spilled motor oil and winter slush. You could run a workshop in there, roll heavy tool chests across it, or park an RV with no worries about cracking, staining, or peeling.
Twin Falls winters? Not a problem. Epoxy resists damage from salt, snowmelt, and freeze-thaw cycles. Summer dust and grit? Sweeps right off. You’re not dealing with a surface that gets worse over time—you’re investing in one that holds up.
Resistant to Just About Everything
One of epoxy’s biggest advantages is chemical resistance. We’re talking brake fluid, gasoline, cleaners, road salt, antifreeze—you name it. Unlike bare concrete that absorbs and stains, epoxy keeps liquids on the surface, making cleanup easy and preventing long-term damage.
Aesthetic Upgrade Without the Fuss
And let’s be honest—epoxy just looks good. Whether you go with a solid color or a flake system, you’re getting a garage that feels more like a finished part of your home. High-gloss finishes reflect light and brighten the space, while satin options offer a subtler, low-maintenance look.
You’re not stuck with boring gray, either. Custom colors, metallics, decorative flakes—epoxy offers a ton of design flexibility. It’s easy to tailor the look to match your style or your setup, whether that’s a clean storage space or a gearhead’s dream garage.
Long-Term Value
A quality epoxy floor isn’t cheap—but it pays off. You won’t be repainting it every spring, patching cracks every fall, or battling dust and debris year-round. And if you’re thinking resale? A garage with a well-done epoxy floor stands out—especially to buyers who value clean, finished utility spaces.
When it comes down to it, epoxy does what a garage floor should: it holds up, cleans up, and looks sharp doing it.
Next, we’ll dive deeper into the different types of epoxy systems—because not all epoxy is built the same, and choosing the right one can make all the difference.
Garage Epoxy Coating Options: Which Type Is Right for You?
Not all epoxy is created equal. One of the biggest mistakes homeowners make is thinking “epoxy” is just one thing. In reality, there are multiple types of epoxy coatings, each with its own pros, cons, and ideal use case. Picking the right system for your garage comes down to how you use the space, what kind of performance you need, and how much you're willing to invest.
Here’s a breakdown of the most common garage epoxy options and where they shine:
100% Solids Epoxy
This is the heavy-duty option. A 100% solids epoxy system is thick, chemical-resistant, and built to last for 15 to 20 years or more. It bonds deep into the concrete, forming a dense, rock-hard surface that can handle hot tires, jacks, engine hoists, and daily abuse without flinching.
If you run a home workshop, store a lot of gear, or just want the best available protection, this is the go-to.
Pros:
Highest durability
Maximum chemical and impact resistance
Great for garages with heavy use or traffic
Cons:
Requires professional installation
Higher cost than lower-grade systems
Shorter working time (sets quickly)
Water-Based Epoxy
Water-based epoxy is a lighter version of the real deal. It’s easier to apply and often used in DIY kits—but it’s also thinner, less durable, and more prone to wear under pressure. It’s okay for light-duty use or low-traffic garages, but in a place like Twin Falls with seasonal extremes, it’s going to age faster.
Pros:
More affordable
Easier to apply (some homeowners DIY this)
Low odor
Cons:
Wears out faster
Not ideal for heavy traffic or chemical spills
Limited resistance to tire peel and abrasions
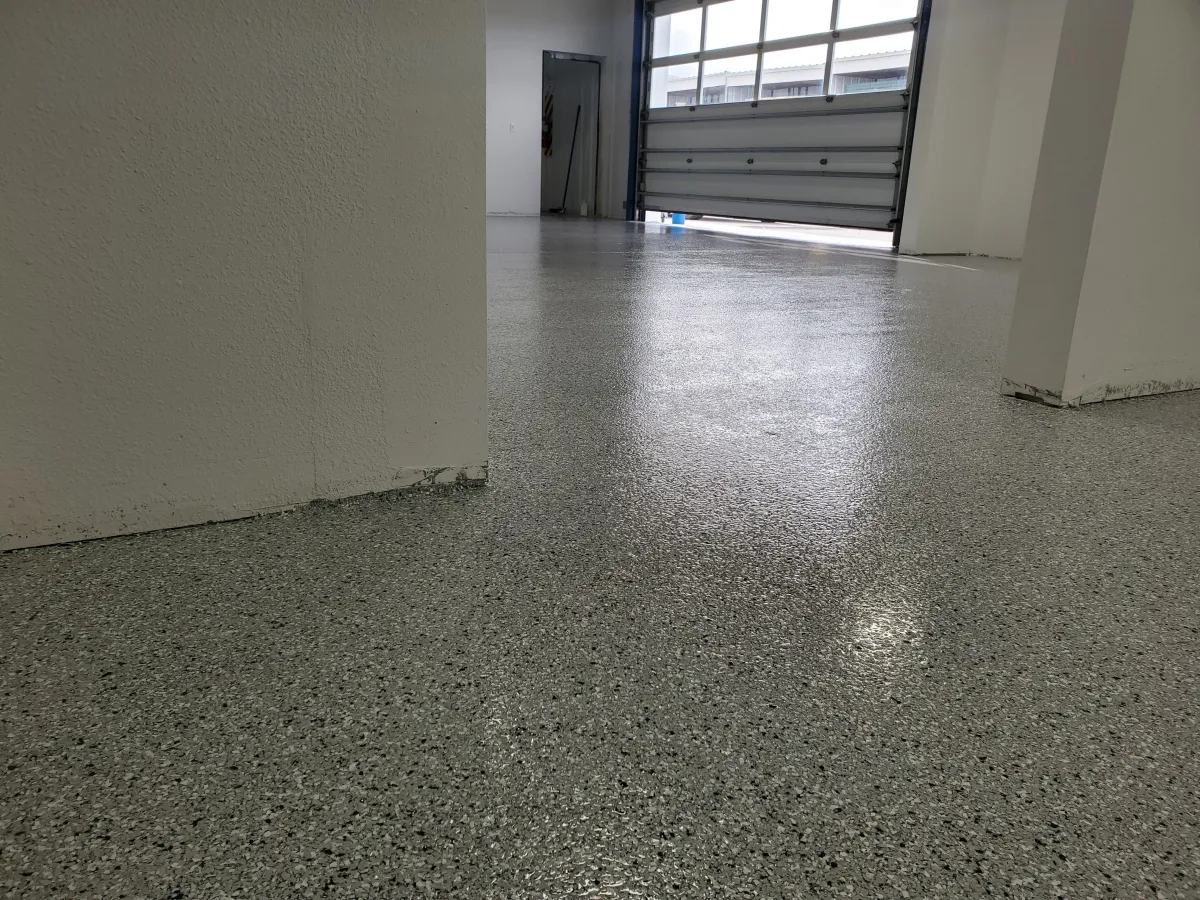
Flake Epoxy Systems
This system includes vinyl chips or “flakes” added between coats, giving a textured, decorative finish that hides dirt and provides extra slip resistance. These are incredibly popular for garage floors because they’re both tough and visually appealing.
Flake systems also help mask imperfections in the concrete and add a little grip when the floor’s wet—ideal for snow runoff or rainy-day messes.
Pros:
Decorative and customizable
Non-slip surface
Hides dirt and imperfections
Cons:
Slightly more expensive than basic solid-color epoxy
Requires precise flake broadcast to look consistent
Metallic Epoxy
Looking for that high-end, showroom look? Metallic epoxy is your flex. It’s made by mixing metallic pigments into a clear or tinted epoxy base, creating a marbled, three-dimensional effect that turns your garage into a visual statement.
Not as rugged as flake or quartz systems, but great for homeowners who care more about aesthetics than beating the floor up with tools and trucks.
Pros:
Stunning, one-of-a-kind visuals
High-gloss, reflective finish
Great for home gyms, man caves, or luxury garages
Cons:
Slippery when wet unless sealed with a textured topcoat
Less abrasion resistance than other options
Higher price point
Quartz Epoxy
Quartz epoxy is a blend of epoxy resin and colored quartz granules, creating a highly textured and incredibly durable surface. It’s often used in commercial and industrial settings but works well for garages that double as workshops or have a lot of foot traffic.
Pros:
Extremely durable and slip-resistant
Excellent for wet or high-traffic environments
Unique textured appearance
Cons:
Rougher finish—not ideal for lounging barefoot
More expensive than standard flake or solid-color options
What About Polyaspartic Topcoats?
Epoxy on its own is tough—but pairing it with a polyaspartic topcoat takes performance up a notch. These topcoats cure quickly, resist UV damage (no yellowing), and add another layer of chemical and abrasion protection. If you want your garage floor to last as long as your concrete slab, this combo is hard to beat.
Design Ideas: Flakes, Colors, Finishes, and Beyond
When most people hear “garage floor coating,” they picture a plain gray slab with a little extra shine. That’s fine… if your garage is just a parking space. But if you’re spending any time in there—working on projects, storing gear, maybe even turning it into a home gym—you’ve got way better options.
With epoxy, you’re not limited to one look. From sleek and modern to bold and textured, your garage floor can reflect your style and serve your needs. Let’s walk through the design features that can take your garage from basic to badass.
Flake Finishes: Function Meets Style
One of the most popular choices is a flake epoxy system. Colored vinyl flakes are broadcast into the base coat and locked in with a clear topcoat. They do more than just look cool—they improve traction, hide dirt, and mask imperfections in the concrete.
Some of the most popular blends we install in Twin Falls include:
Gray/black/white: clean and industrial—great for a modern shop look
Tan/white/brown: warmer tones that feel more residential
Blue/black/white: sporty and high-energy
Custom colors: want to match your favorite team, car, or brand? We can do that too.
Solid Color Epoxy: Clean, Bold, Simple
Don’t overlook a solid color system. When done professionally, it creates a crisp, uniform look that’s easy to clean and incredibly sharp. Think jet black, slate gray, or even bright red if you want to make a statement.
This style is often preferred for:
Car enthusiasts who want a showroom feel
Homeowners with sleek storage cabinets or toolboxes
Businesses using garages for commercial purposes
Metallic Epoxy: Luxury Vibes
If you’re after something eye-catching, metallic epoxy delivers. It’s not subtle—it’s bold, swirled, and full of depth. The reflective finish makes your floor look like molten lava, polished stone, or even brushed metal depending on the colors used.
Best for:
Showroom garages
Man caves
Bonus rooms or converted garage spaces
Finish Options: Gloss or Satin?
High-gloss finishes reflect light and brighten the space, especially in garages without much natural lighting. Satin finishes cut down glare and show fewer streaks. If you’re using the space for heavy-duty work, a satin finish may be the more practical route.
The Installation Process: What Really Goes Into It
Installing a garage floor coating isn’t just rolling on some paint and hoping for the best. A lasting epoxy floor starts with professional-grade prep work—and without it, even the most expensive epoxy product will fail. If you’ve ever seen a peeling or bubbling garage floor, you’re probably looking at a poor prep job.
Here’s how a real, durable garage floor epoxy system gets installed by a pro crew like Orr Floor Care.
Step 1: Concrete Surface Prep
First, the concrete has to be cleaned, profiled, and repaired. This means grinding the surface with industrial diamond grinders to open up the pores of the concrete. This step ensures the epoxy doesn’t just sit on top, but actually bonds deep into the slab.
In Twin Falls, we often see garage floors with hairline cracks, spalling, or oil stains—these get repaired and cleaned before anything else happens.
No shortcuts here. Pressure washing, acid etching, or just sweeping the floor isn’t good enough. Mechanical grinding is the only prep method that guarantees long-term adhesion.
Step 2: Moisture Testing
Garage floors can trap moisture underneath, especially if the slab wasn’t properly sealed from below. If that moisture rises after installation, it can cause delamination, bubbles, or white crystal deposits.
We test for moisture content to ensure the floor is ready—and if it’s not, we use moisture mitigation primers to keep problems from bubbling up down the road.
Step 3: Primer and Base Coat
Once the surface is clean and dry, we apply a primer or base coat. This layer penetrates into the concrete and acts as the foundation for the entire system.
Depending on the system chosen (solid color, flake, metallic, etc.), we’ll adjust the mix and application method to suit the final design and performance goals.
Step 4: Broadcast and Build
If you’ve selected flakes or quartz, this is when they’re applied. Flakes are broadcast into the wet base coat by hand to ensure even coverage and visual consistency.
Once cured, the surface is scraped to remove excess flakes, and it’s vacuumed to prepare for the topcoat.
Step 5: Topcoat Application
Finally, we apply a durable polyurethane or polyaspartic topcoat. This seals the surface, locks in the design, and adds UV, chemical, and abrasion resistance. It’s what keeps the floor looking sharp for years to come.
Depending on temperature and humidity, the floor may cure in as little as 24–48 hours.
Garage Floor Coating Costs: What You Can Expect to Pay
Let’s talk numbers—because while a coated garage floor is a serious upgrade, it doesn’t have to break the bank. But like anything else in home improvement, the cost depends on what you want and how well you want it done.
In Twin Falls and the surrounding areas, the cost of professional garage floor coating typically ranges between $4 to $8 per square foot, depending on the size of the garage, the condition of the concrete, and the type of system you choose.
Here’s what affects the final price:
1. Square Footage
A standard two-car garage is around 400–500 square feet. At $6/sq ft, you’re looking at $2,400 to $3,000 for a high-quality epoxy system installed by professionals. Bigger garages or commercial shops will obviously scale up from there.
2. Surface Condition
If your floor is in rough shape—cracks, pitting, old paint, oil stains—it’s going to take more prep work. Concrete repair, moisture barriers, or oil spot primers can add to the cost, but they’re essential for proper bonding. Skipping this part is what leads to failed coatings.
3. Type of Epoxy System
Solid Color Epoxy: Most cost-effective
Flake Systems: Slightly more due to materials and extra labor
Metallic Epoxy: Premium pricing, mostly due to the artistic skill and labor involved
Quartz Systems: Often the most expensive due to double broadcast and thick topcoats
4. Optional Upgrades
Want a polyaspartic topcoat for faster curing and UV resistance? Anti-slip additives? Custom flake blends? These all add value—and a bit to the bottom line.
What About DIY Kits?
Sure, you can grab a $200 epoxy kit off the shelf and give it a shot. But between buying extra tools, prepping the floor properly, and hoping it actually bonds? You’ll likely be spending another $1,500 to fix it when it starts peeling next year.
Bottom Line:
A professionally coated garage floor might cost more up front—but you’ll save thousands in repairs, maintenance, and headaches over the next decade.
Mistakes to Avoid: Why DIY Kits and Cheap Contractors Don’t Last
We get it—there’s a certain appeal to the $199 DIY epoxy kit on the shelf. Slap it on over the weekend, let it dry, and boom—new garage floor, right?
Wrong.
The truth is, most garage floor coating failures come down to bad prep and cheap materials. And unfortunately, that’s exactly what you get with DIY kits and low-budget contractors.
DIY Kits: All Hype, No Backbone
Let’s start with the kits. Most big-box epoxy kits are water-based and less than 50% solids, which means they’re thin, weak, and prone to peeling. They also skip critical prep steps like moisture testing and mechanical grinding, which are absolutely essential for proper adhesion.
You might get a decent-looking floor for a few months, but as soon as the weather shifts or your hot tires sit on it? It’ll start lifting, flaking, or turning yellow.
Cheap Contractors Cut Corners
Some contractors advertise “garage epoxy” at a bargain price—but what they’re really selling is concrete paint or diluted resin applied with minimal prep. No grinding. No proper base. No topcoat.
These jobs often look great on day one… and start failing by month six.
Here’s what cutting corners usually looks like:
Acid washing instead of grinding
Skipping crack repairs or patching with low-grade filler
Using low-solids epoxy or one-part systems
No UV-resistant topcoat
No slip resistance added
And when the floor fails? They’re long gone—or worse, they offer to “touch it up” with more of the same junk.
Invest Once, Do It Right
If you’re going to coat your garage floor, do it once and do it right. A professionally installed epoxy system from Orr Floor Care comes with proper surface prep, top-grade materials, and experience that guarantees it’ll actually last.
Maintenance: How to Keep Your Epoxy Floor Looking New for Years
One of the best parts of a professionally coated garage floor? It’s low-maintenance by design. Epoxy floors are built to handle the abuse—but a little regular care goes a long way in keeping them looking like the day they were installed.
Here’s what we recommend to keep your garage floor coating in peak condition year after year.
Sweep Regularly
Dirt, grit, and debris act like sandpaper. Over time, they’ll dull the finish, especially in high-traffic areas. A soft-bristle push broom or dust mop once a week is usually all it takes to keep the surface clean.
Mop as Needed
For deeper cleaning, mix a few drops of mild dish soap or a gentle cleaner like Simple Green in warm water. Mop the floor with a soft mop or microfiber pad. No need for harsh chemicals—epoxy doesn’t stain easily, and most spills wipe right up.
Avoid acidic cleaners, bleach, or anything abrasive. These can break down the topcoat over time and dull the shine.
Watch for Standing Water
Epoxy is water-resistant, but standing water from snowmelt or big spills can eventually cause issues around edges or expansion joints. Sweep or mop up puddles when you notice them—especially in winter months.
Preventative Tips
Use rubber mats or pads under jack stands and heavy equipment to avoid surface damage
Don’t drag sharp metal tools or rough-edged storage bins across the floor
Consider resealing or refreshing the topcoat every 5–7 years if you want to restore the original gloss and performance
Long-Term Value
With just a bit of basic upkeep, your epoxy garage floor can easily last 10–20 years—without the stains, dust, and ongoing hassle of bare concrete.
Why Twin Falls Homeowners Choose Orr Floor Care for Garage Epoxy
You’ve seen what goes into a professional garage floor coating—now here’s why homeowners all over Twin Falls trust Orr Floor Care to get it done right.
We don’t believe in shortcuts, gimmicks, or quick fixes. Our team brings years of hands-on experience, industrial-grade equipment, and top-tier materials to every job. When we coat your garage floor, we’re not just giving it a facelift—we’re protecting it for the long haul.
What makes us different?
We know Idaho concrete. Twin Falls sees extreme temperature swings, winter moisture, and a lot of road grit. We prep and install our floors with local conditions in mind.
We don’t cut corners. Every job starts with proper surface prep—diamond grinding, moisture testing, and full crack repairs. It’s the only way to get a floor that lasts.
We use real materials. No diluted paint systems, no mystery mixes. Just high-solids epoxy, flakes, and UV-resistant topcoats that hold up year after year.
We show up on time and finish the job. Our team is clean, professional, and efficient—because your time matters.
We stand behind our work. Ask around. Our reputation is built on word of mouth, and we intend to keep it that way.
Whether you’re looking for a clean, durable upgrade or a full-on custom flake system, Orr Floor Care delivers the quality you’re paying for—and then some.
Ready to Upgrade Your Garage? Let’s Talk.
Your garage deserves better than a dusty, cracked slab. Whether you want a clean, durable surface that stands up to the mess—or a sharp, customized look that turns heads—a professional garage floor coating is the upgrade that makes it happen.
And when you’re ready to do it right, Orr Floor Care is here to help.
We offer free consultations across Twin Falls and the surrounding areas. No pushy sales pitches, no guesswork—just straight answers, expert recommendations, and real solutions that last.
Got questions about flake colors, finish types, or pricing? Let’s walk through your options and build a plan that fits your space and your goals.
Give us a call at (208) 404-6679, email [email protected] or fill out our contact form to schedule your consultation.
Let’s turn that garage into a space you actually want to walk into.

